
Preparing for your first close in Nextera Accord
Most of the work in a lease accounting implementation happens before anyone logs in. This page covers that work first, then walks you through a first lease inside the product. It is written for a financial controller or a lease accounting lead.
Before you start
Section titled “Before you start”Decisions your organisation must make
Section titled “Decisions your organisation must make”None of these are system settings, and all of them are audit-relevant. Settling them before configuration is the single largest determinant of how smoothly the implementation goes:
- Reporting framework. IFRS 16, PSAK 116, or both for a dual-reporting group.
- Recognition exemptions. Whether to elect the short-term exemption, and for which classes of underlying asset. Whether to elect the low-value exemption, and what absolute threshold you will treat as low value — remembering that it is assessed on the value of the asset when new, not on materiality to your financial statements.
- Incremental borrowing rate methodology. How rates are derived, what observable inputs support them, how often they are refreshed, and at what granularity — entity, currency, term band, or asset class. Your auditor will test this, and the product stores only the output, one number per lease.
- Lease term policy. How “reasonably certain” is assessed for extension and termination options, and who signs that assessment off. This is a judgement, and every judgement needs an owner.
- Materiality and scoping thresholds for contract review — the point below which you will not individually assess a contract, and the basis for that conclusion.
Data you must gather
Section titled “Data you must gather”| Input | Typical owner | Why it is needed |
|---|---|---|
| Complete contract population | Procurement, Legal, each business unit | Completeness is the single biggest audit risk |
| Signed contracts and amendments | Legal / contract repository | Terms, options, payment schedules, residual value guarantees |
| Payment schedules | Accounts payable | Filling the Payment Plan tab, and splitting fixed, index-linked and usage-based payments |
| Existing lease register | Finance | Reconciliation baseline |
| Discount rate table | Treasury | Filling Annual Discount Rate on every Lease record |
| Chart of accounts and cost-centre mapping | Finance systems | Filling Chart of Account, Account Dimension and Accounting Rule |
| Prior-period comparatives | Finance | Transition and disclosure |
A note on the first row: the contract population is where implementations actually fail. Contracts titled “lease” are easy to find; leases embedded in service, outsourcing, warehousing and IT hosting agreements are not, and they are just as much in scope. Budget real time for contract review, and treat it as a completeness exercise across the whole organisation rather than a finance task.
People you need available
Section titled “People you need available”- A lease accounting owner with authority to make the five policy calls above — not to research them, to decide them.
- A contract owner per business unit, because finance does not hold the contracts.
- Someone who can commit the finance-systems side of journal integration.
- Your external auditor, early rather than late. Policy positions agreed with your auditor before implementation cost a conversation; the same positions challenged after your first close cost a restatement of your opening balances.
What “done” looks like
Section titled “What “done” looks like”A first cycle is complete when, for the reporting period:
- The contract population is documented, and every contract has a lease / not-a-lease conclusion with a stated reason — including the ones concluded not to be leases.
- Every in-scope lease has a right-of-use asset and a lease liability recognised at the correct commencement date.
- Period journals — depreciation, interest accretion, payments — are produced and reconciled to the general ledger.
- The disclosure set and the liability maturity analysis are generated from the same data as the journals, not rebuilt separately.
- Your auditor can trace any number in the disclosure back to a signed contract.
Note the order: completeness first, then measurement, then reporting. A remeasurement engine cannot compensate for a lease nobody entered, and no amount of system sophistication fixes an incomplete population.
Working through it in the product
Section titled “Working through it in the product”The first screen after you sign in
Section titled “The first screen after you sign in”There is no setup wizard. After you sign in you land on Home, which holds five widgets and answers exactly one question — what is waiting for me today:
| Widget | What it holds |
|---|---|
| Task › To Do | Records waiting on an action from you |
| Task › Recent | Records you touched recently |
| Task › Pending Items | Open items, with a Status filter offering All, Open, Closed |
| Transaction › Summary | Transaction counts by status — Draft, In Progress, Waiting Approval, Completed, Cancelled |
| Transaction › Details | The detail behind that summary |
All configuration is done from the System menu, not through a wizard.
Master data you need first
Section titled “Master data you need first”Open System › System Settings. The left panel is the master data tree, split into four groups.
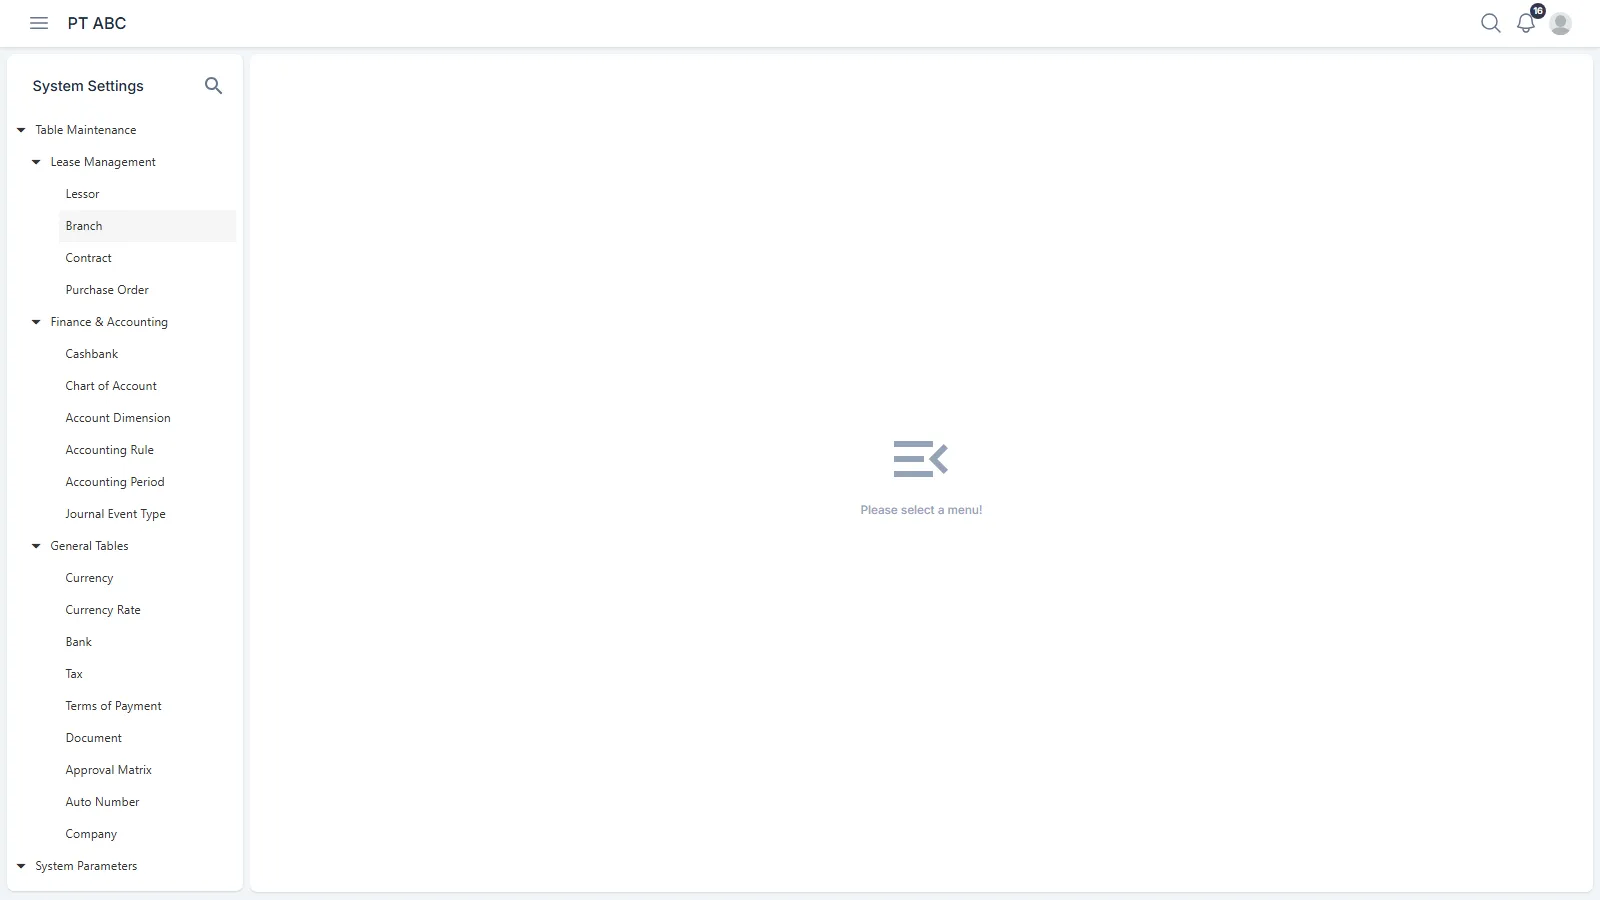
| Group | Entities |
|---|---|
| Lease Management | Lessor, Branch, Contract, Purchase Order |
| Finance & Accounting | Cashbank, Chart of Account, Account Dimension, Accounting Rule, Accounting Period, Journal Event Type |
| General Tables | Currency, Currency Rate, Bank, Tax, Terms of Payment, Document, Approval Matrix, Auto Number, Company |
| System Parameters | System parameters |
A sensible order to fill them in, and the reasoning behind it:
- Company, Branch and Currency — the organisational frame. Every Lease requires a Lease Branch and a Lease Currency.
- Auto Number — the document numbering patterns. Without this, no Lease No is issued.
- Lessor — the party granting the lease, with
Profile,AddressandBank Accounttabs. The accounts on that third tab are what appear as Payment To choices when you pay. - Contract and Purchase Order — the umbrellas a Lease record points at through Contract No and PO Number.
- Tax and Terms of Payment — the VAT and WHT codes, and the terms that derive an invoice’s Due Date.
- Chart of Account, Account Dimension, Journal Event Type, Accounting Rule and Posting Rule — the chain that decides which account each event uses. This is the heaviest work on the list, and the work that most needs your finance systems team involved.
- Accounting Period — one row per month, with Fiscal Year, Fiscal Month, Period Name, Period Start, Period End and a Status of either Open or Closed.
- Approval Matrix — who approves what. A row sets a Transaction Type, Criteria and Branch, then Level, Approver, Mode, Is Auto Approve and Is Auto Request. With no matching row, a record has no approval path at all.
The rest — Cashbank, Bank, Currency Rate, Document — are needed once you start billing and paying, not when you enter your first lease.
Users and access rights
Section titled “Users and access rights”These live under System › System Security, and the model has two layers.
Access Rights holds the access definitions, and every record carries an Access Type:
| Access Type | What it means |
|---|---|
| Menu Access | What may be seen and done — e.g. Menu Access: Group Staff Keuangan, Menu Access: Group Accounting Staff, Menu Reports: ALL |
| Authorization | Which data may be touched — e.g. Authorized CashBank: Kantor Wilayah Jakarta, Authorized System Parameter: Lease Management |
Users holds the people. The Type column separates two kinds of record: Group, which acts as a role template (Group Staff Keuangan, Group Manager Cabang, Group Kadep Accounting 1), and User, an actual person placed into a Group. Beyond its Group, a User carries a Location, a Division and a Department.
On a User record, the Access Rights tab lists the access granted, with Access Name and Access Type columns. So granting access means two things at once — which menus light up, and which branches or parameters may be seen.
Creating your first lease
Section titled “Creating your first lease”Step 1 — open Lease, then New. The New button at the top right of the list page is a menu with two choices, New and Upload. Pick New.
The form is deliberately short — eight fields, every one of them picked from reference data:
Lease Branch · Lease Sub Branch · Contract No · PO Number · Lease Description ·
Lessor · Lease Class · Lease Category
Choosing a Contract No fills in Lessor automatically. Save to continue.
Step 2 — answer the Questionnaire. The questionnaire screen opens immediately after you save, and cannot be skipped. It is what decides whether this contract is measured under the standard; its contents are covered in full in Lease accounting concepts. When you are done, press Continue.
Step 3 — complete the General tab. The detail screen opens in edit mode, and this is where all the numbers and dates go in.
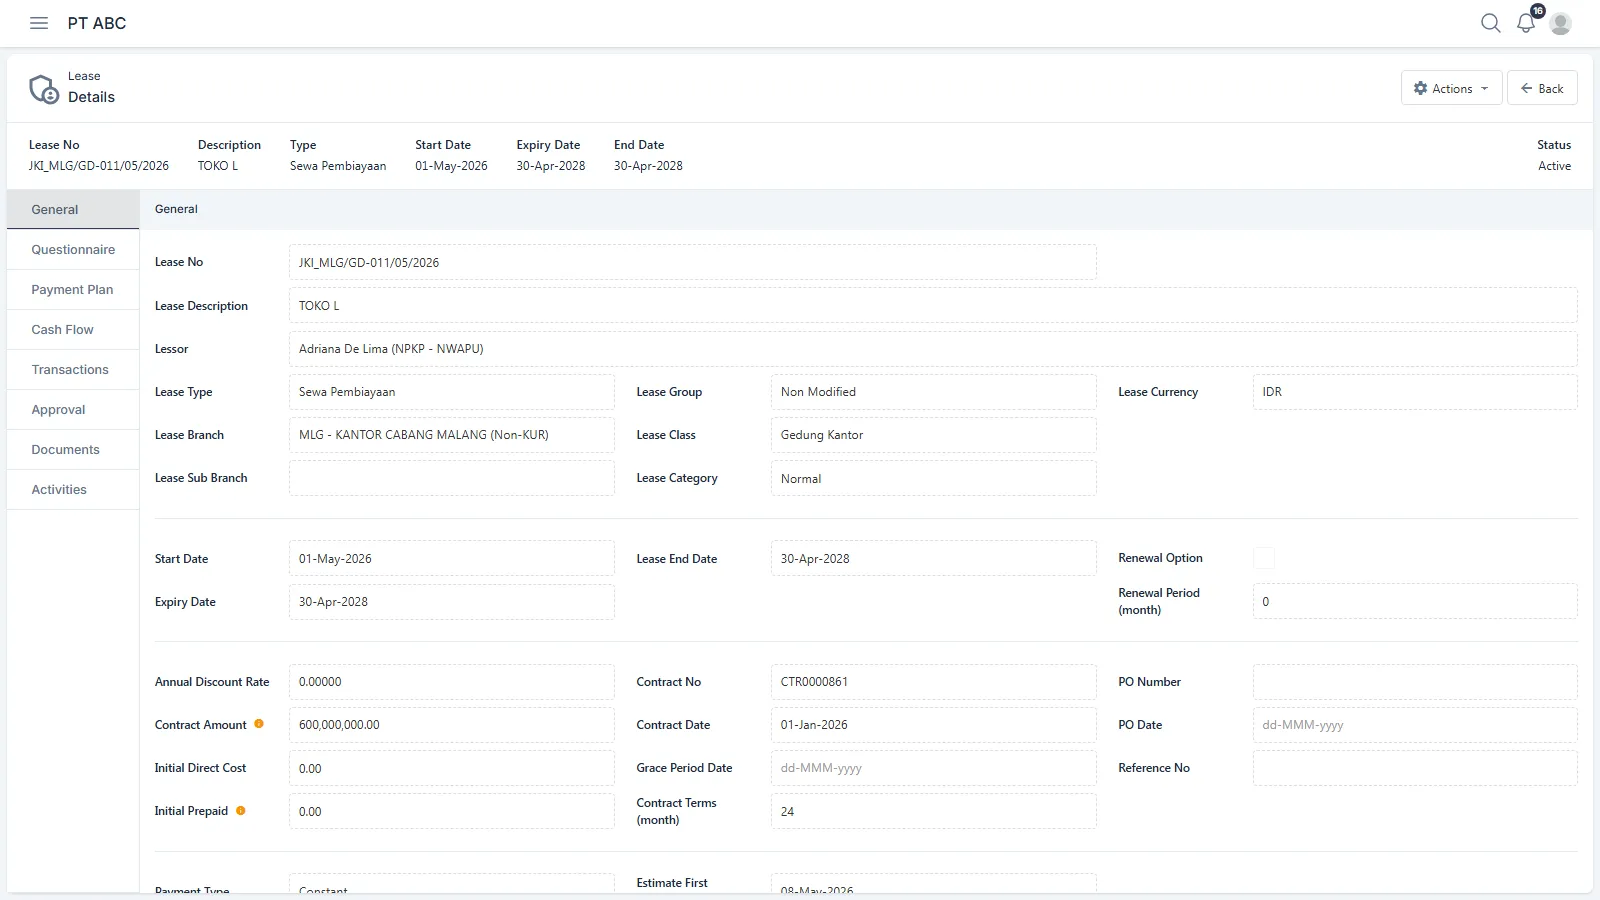
| Field block | What you fill in |
|---|---|
| Identity | Lease Description and Notes |
| Lease term | Start Date, Expiry Date, Renewal Option, Renewal Period (month), Grace Period Date, Contract Terms (month) |
| Measurement | Annual Discount Rate, Contract Amount, Initial Direct Cost, Initial Prepaid |
| Payment | Payment Type, Estimate First Payment Date, Frequency, Number of Payment, Payment Amount |
What you do not fill in, because it comes from elsewhere: Lease No from Auto Number,
Lease Type from the Questionnaire, Lessor / Lease Branch / Lease Class / Contract No /
PO Number from step 1, and Lease End Date, calculated from Expiry Date plus
Renewal Period (month) when Renewal Option is ticked.
The two things that raise the most questions:
- The measurement fields can only be filled while the status is Draft. Once the lease is validated, the only way to change them is through the Lease Transactions module.
- The payment block disappears when the contract has no instalments — for example when Contract Amount equals Initial Prepaid. That is deliberate behaviour, not a missing field.
Fill Contract Amount, Initial Prepaid and Payment Amount with the tax base value, the Dasar Pengenaan Pajak; all three carry an information icon that says exactly that.
Step 4 — fill in the Payment Plan.
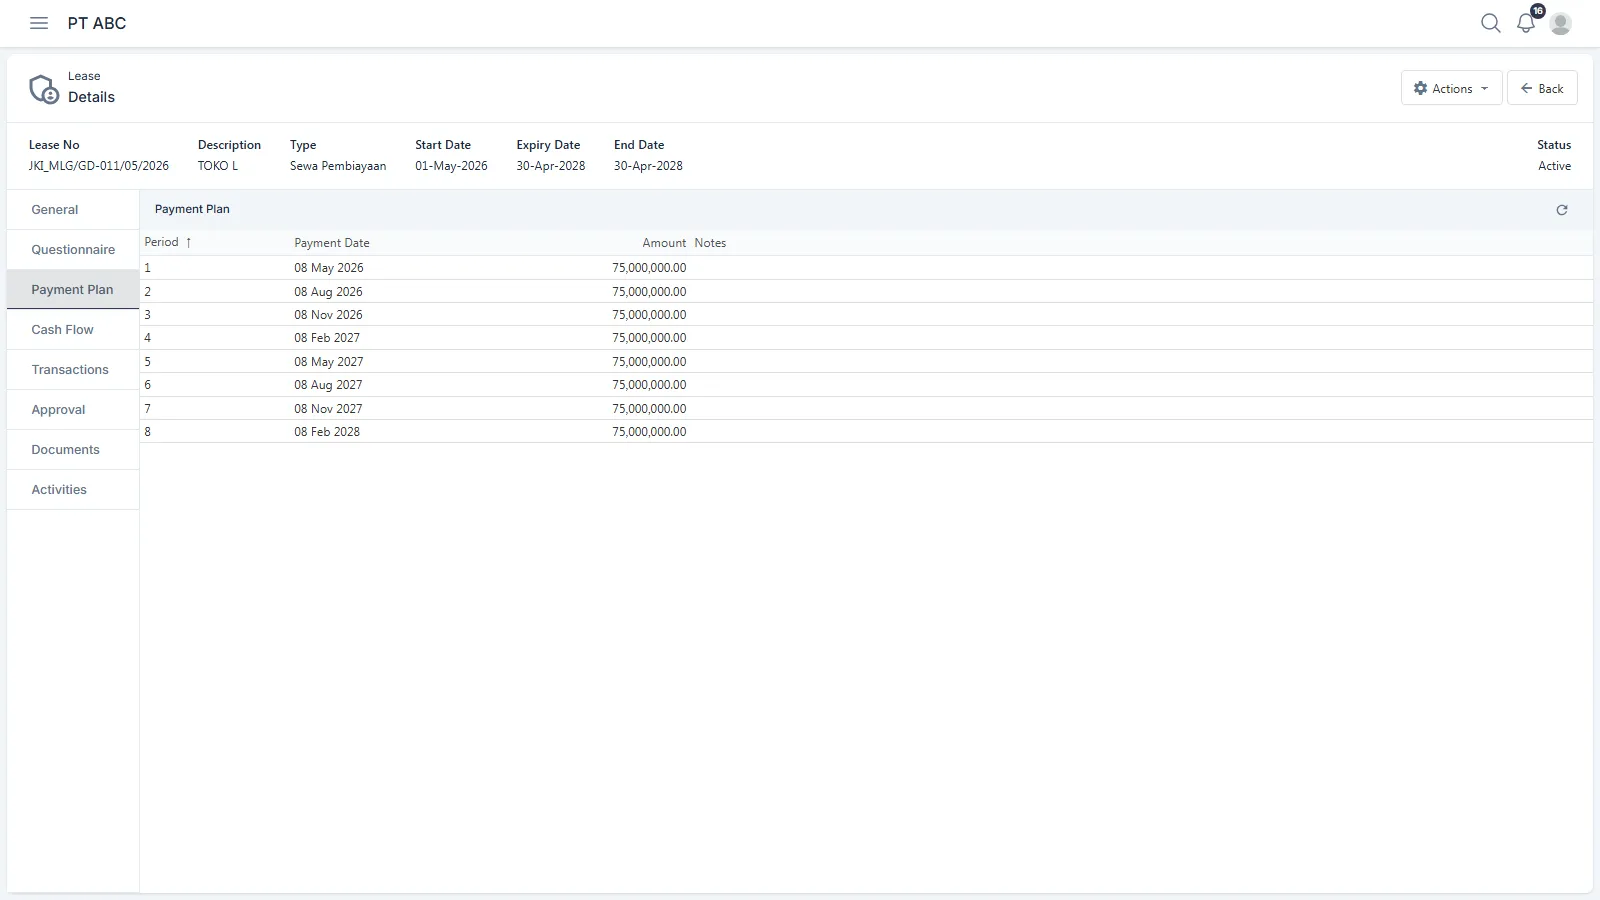
For a Payment Type of Constant, Single or Full Payment, the schedule is generated from the payment fields on the General tab. For Variable, add rows one at a time through the add icon at the right of the tab header, or upload them all at once through the upload icon beside it. Every row carries Modify and Remove links for as long as it may still be changed.
Step 5 — Validate. Actions › Validate. The status moves from Draft to Validated. If a value is incomplete, the message names the offending field; fix it through Modify and try again.
Step 6 — Calculate. Actions › Calculate. A dialog appears while the calculation runs. The status moves to Ready for Approval, and the schedule appears on the Result tab.
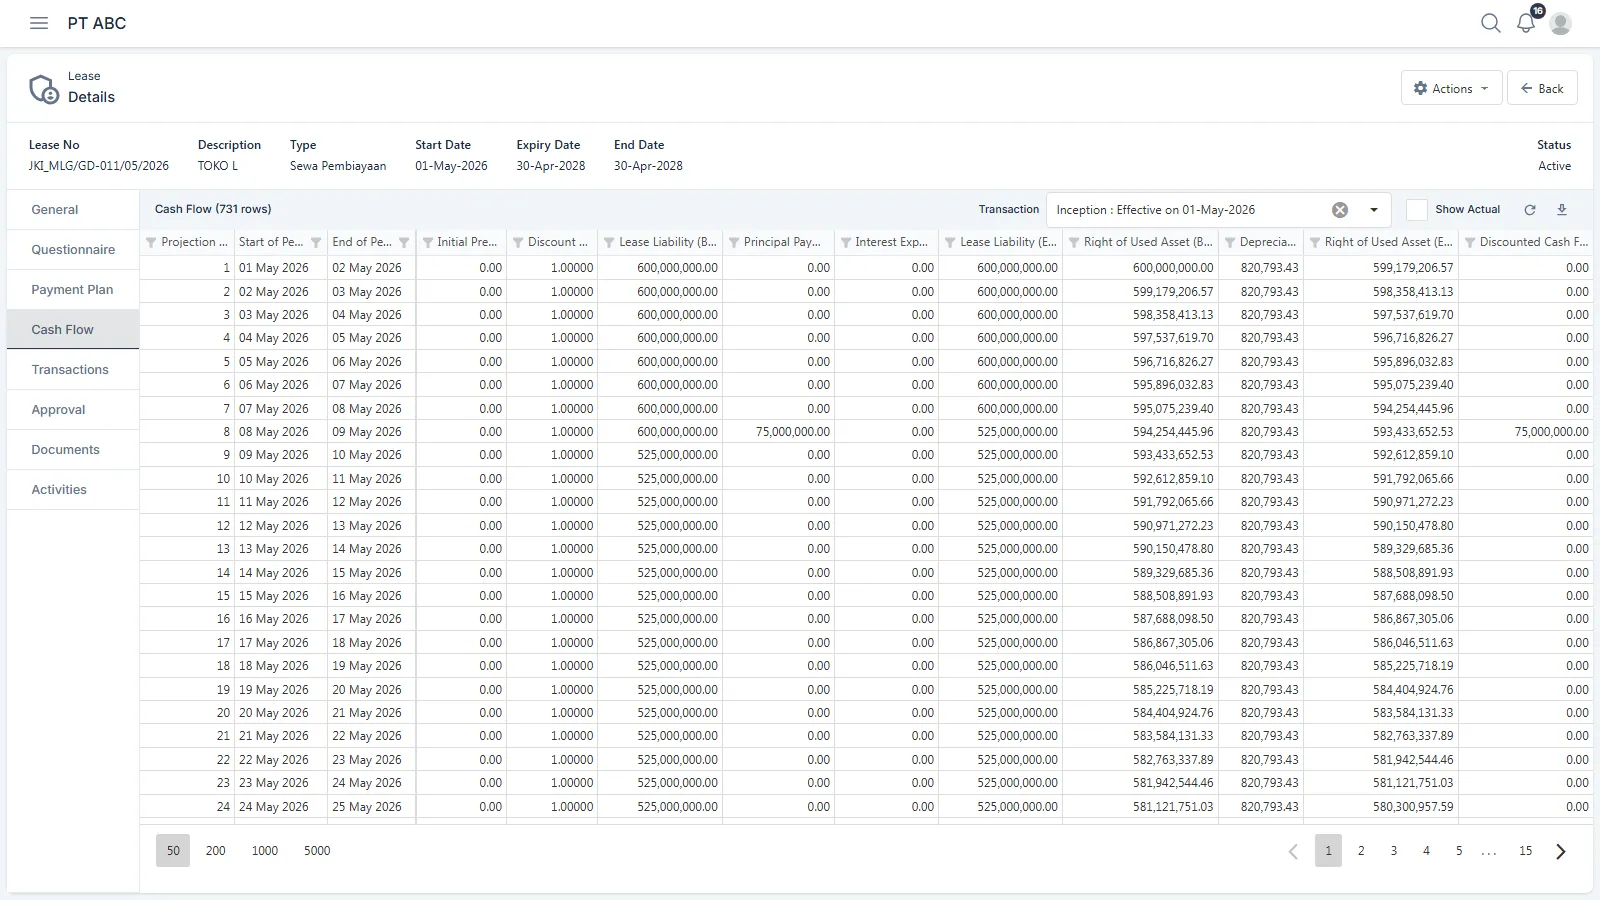
Check the result before you request approval. The fastest tells for an input error: the first
Lease Liability (BOP) row should equal the present value you expect, Depreciation should be
level, and the last Lease Liability (EOP) row should be zero.
Step 7 — Request for Approval, then Approval. Actions › Request for Approval moves the record to Waiting for Approval and surfaces it in the approver’s Task widget. The approver opens the same record and runs Actions › Approval. If your Approval Matrix has more than one level, the status rests at Partially Approved until the last level approves, and then becomes Active.
The Approval tab on the record shows the trail, and the Activities tab shows the whole history of changes together with who made them.
Lease status and the actions it enables
Section titled “Lease status and the actions it enables”| Status on screen | Actions available |
|---|---|
| Draft | Modify · Validate · Cancel |
| Validated | Calculate · Reverse |
| Ready for Approval | Request for Approval · Reverse |
| Waiting for Approval | Approval · Reverse |
| Partially Approved | Approval · Reverse |
| Declined | Reverse |
| Active | Modify |
Two further end states come from the system side — Terminated and Mature — and both still show the Cash Flow and Transactions tabs.
Loading many leases at once
Section titled “Loading many leases at once”For the initial migration, use Lease › New › Upload.
- The upload screen shows one row per file it asks for, each with a Download Template link. Download the template first — its structure is what counts, not a sample file from another implementation.
- Fill in the template, then upload it through Upload File or drag the file onto the drop area.
- Press Next.
- The result screen shows Total Upload, Total Success and Total Failed, then a grid of every row with Status and Invalid Message columns.
Failed rows are not created, and the reason is written out row by row. Fix the file and repeat; Back returns you to the upload screen, Finish closes the process.
The same upload feature is available for the Payment Plan inside a Lease record.
Running a period
Section titled “Running a period”Monthly values. Open Batch Transactions › New, set Batch Date to the period end date and choose a Job Name — for the monthly close, the job is called Monthly Valuation. The parameter fields below it change with the job you choose. Save, open the record, then run Actions › Run.
A batch’s status moves from not yet run to Completed or failed, and the Start and Finish columns record the timings. A failed batch may be run again.
Journals. Open Accounting › Journal Entries. Journals in Accord are generated by processes, not typed on this screen — this screen is for reviewing, posting and tracing. Tick the rows you want and run Actions › Posting; UnPosting reverses the posting of a journal already Posted. Results are reported row by row, so a bulk action can partly succeed.
Journals do not go through the approval matrix — there is no Approval tab in this module. The control sits in the Posting access rights and in the period status.
The ledger. Accounting › Ledger is a read-only grid of movements by account, filtered by a Ledger Date from–to range, Account and Transaction.
The Ledger does not show dimension columns. Analysis by cost centre or by any other dimension is done through Reports.
Sending to the host GL. Accounting › Journal Feeds is an outbound queue towards your host general ledger — not an import of journals from another system. Its contents are filtered by Event Model, Event Class, Event Type and Status, and the Show All checkbox opens up every column. Filling the queue itself runs as a batch, not from this screen.
Reports. Reports carries the report tree on the left. Pick a report, fill in its parameters, choose an Output Type, then run it. In the table view a Download button exports the result.
Getting access
Section titled “Getting access”Nextera Accord normally runs at accord.nextera.id. Accounts are provided by the product
administrator in your organisation. The address above is the production address; if your
organisation uses a dedicated environment, use the address in your onboarding pack.